Create CI & CD pipelines in Azure DevOps for .NET Core Application on Containers and Deploying to a OpenShift Cluster

In this article, we will show how to set up a CI/CD pipeline to deploy a containerized ASP.NET Core (5.0) Web API application into an OpenShift Kubernetes cluster using Azure DevOps.
What is a CI/CD pipeline?
A CI/CD pipeline is a series of steps that must be performed in order to deliver a new version of software. Continuous integration/continuous delivery (CI/CD) pipelines is one of the best practices for DevOps teams to implement, for delivering code changes more frequently and reliably.
Continuous Integration(CI) is the process of automating the build and testing of code every time a team member commits changes to version control.
Continuous Delivery (CD) is an extension of continuous integration since it automatically deploys all code changes to a testing and/or production environment after the build stage.
Prerequisites & Setup
- Azure DevOps account: We will use an Azure DevOps project for a Git repo and build/release pipelines. Create account and a new project here. Make sure you have Project Admin rights to the Azure DevOps account.
- RedHat OpenShift Cluster: platform as a service built around docker containers orchestrated and managed by Kubernetes on a foundation of Red Hat Enterprise Linux. In this article we are using OpenShift cluster provision on AWS. You can read my pervious article how to setup OpenShift cluster on AWS ( Provision Red Hat OpenShift Cluster On AWS) also you can use AWS ROSA to setup openshift cluster.
- Source Code: You can download the source code from my GitHub profile (Link).
Let’s start!!!, We’ll then dive into the detail of how we can setup CI/CD pipeline.
Step 01 : Create Application & Push to the GitHub
In this step we need to create or login into the Github ,then create a public repository. After that we need to create a simple .Net Core Web API application using visual studio 2019 and push the source code in to the GitHub repository.

Step 02 : Create Continuous Integration (CI) pipeline
- You also need a Microsoft Azure DevOps account. Once you log into this account, you should see a list of your organizations on the left, and all projects related to your organization on the right. If you do not have any projects, it is time to add a new one.

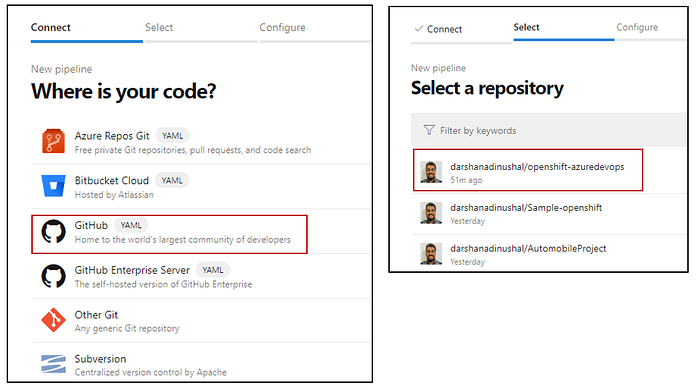
2. Create pipeline ,Navigate to the Pipelines tab in the left side panel and click the create button to create new pipeline.

3. Select GitHub option then select project that we created previous step 01.
4. Select Starter pipeline option. Starter pipeline start with a minimal pipeline that you can customize to build and deploy your code.

5. What’s a Classic UI pipeline and what’s a YAML pipeline?
Classic UI you can build a pipeline by using a GUI editor, that is the original way Azure DevOps pipelines are created.
YAML is the newer way where you can define the pipeline as code, in YAML format, which you can commit to the repo. Azure DevOps does have an assistant to help you create/modify the YAML pipelines, so you don’t have to remember every possible setting or keep having to look up references. For a new project with a modern team, It’s better to go with YAML.
6. Exposing OpenShift Image Registry.
OpenShift Container Platform, the registry is not exposed outside of the cluster at the time of installation. Follow the steps below to expose the image registry. We can used any docker image registry like Docker Hub ,Azure Container Registry or Google Container Registry.
- Login to the Openshift cluster using openshift CLI tool.
oc login -u <cluster-admin-username> -p <password>- To expose the registry using DefaultRoute ,Set DefaultRoute to True
oc patch configs.imageregistry.operator.openshift.io/cluster --patch '{"spec":{"defaultRoute":true}}' --type=merge- Get the Host path of the image registry
HOST=$(oc get route default-route -n openshift-image-registry --template='{{ .spec.host }}')

echo $HOST- Grant the permission to the user to edit & view registry
oc policy add-role-to-user registry-viewer <user_name>

oc policy add-role-to-user registry-editor <user_name>- Generate the TLS Certificate
oc extract secret/router-ca --keys=tls.crt -n openshift-ingress-operator
- Copying TLS certificate file from EC2 into your local machine.
Your private key must not be publicly visible. Run the following command so that only the root user can read the file.
chmod 400 yourPublicKeyFile.pemTo copy files between your computer and your instance you can use an FTP service like FileZilla or the command scp. “scp” means “secure copy”, which can copy files between computers on a network. You can use this tool in a Terminal on a Unix/Linux/Mac system.
scp -i /directory/to/abc.pem user@ec2-xx-xx-xxx-xxx.compute-1.amazonaws.com:path/to/file /your/local/directory/files/to/download
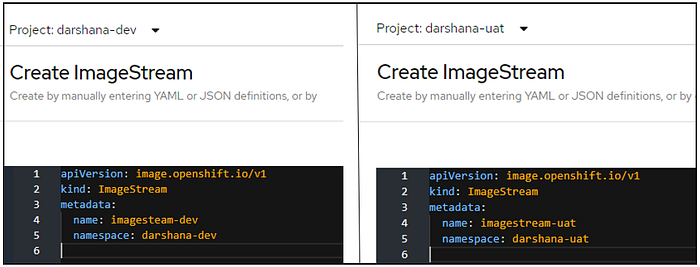
7. Create OpenShift project and Image stream.
oc create project darshana-dev
oc create project darshana-uat
Create ImageStream each project (DEV, UAT).
An Imagestream and its associated tags provide an abstraction for referencing container images from within OpenShift Container Platform. The imagestream and its tags allow you to see what images are available and ensure that you are using the specific image you need even if the image in the repository changes (Link).
8. Create new service connection for Openshift image registry in Azure-DevOps.

9. TLS certificate as a secure file in Azure-DevOps.
Navigate to the Azure DevOps Library , press the (+) button to upload the TLS Certificate that we download in the pervious step.

DownloadSecureFile Use this task in a pipeline to download a secure file to the agent machine.

10. Build a Docker Image
Here we need to build an docker image base on the Dockerfile in our repository. Once we build an image, then push it to openshift image Registry (Step 04). (You can use any other image registry like AWS ECR , Azure Container Registry, Docker Hub, and Google Container registry)

Step 03 : Unit Testing & Code Coverage
Unit Testing , also known as Component testing, is a level of software testing where individual units / components of a software are tested. The purpose is to validate that each unit of the software performs as designed.
- Create a unit test project
Unit tests provide automated software testing during your development and publishing. MSTest is one of three test frameworks you can choose from. The others are xUnit and nUnit. You can create unit test project using visual studio use this (Link) and create a test project in the same solution. The test project must reference Microsoft.NET.Test.SDK version 15.8.0 or higher and other MSTest nuget packages.
Here also you can download source code from my git repository I add very basic single test method.

2. Add Unit Test task to the pipeline.
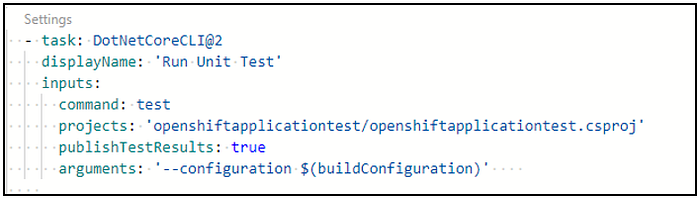
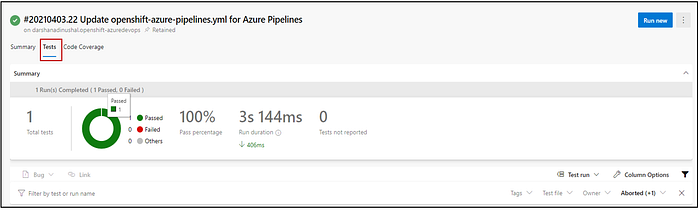
3. Run your unit test.
Run the azure devops pipeline and see the test result.
4. Add a Code Coverage.
Unit tests help to ensure functionality, and provide a means of verification for refactoring efforts. Code coverage is a measurement of the amount of code that is run by unit tests — either lines, branches, or methods.
Add the following snippet to your pipeline.
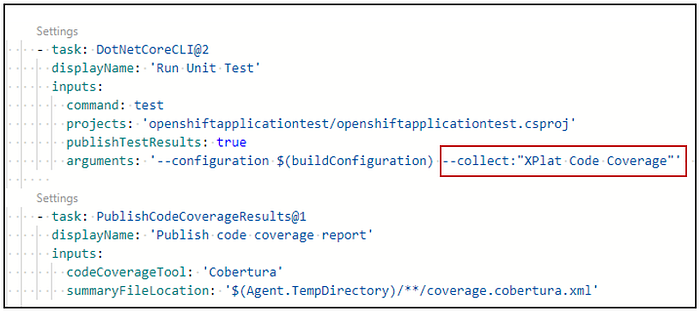
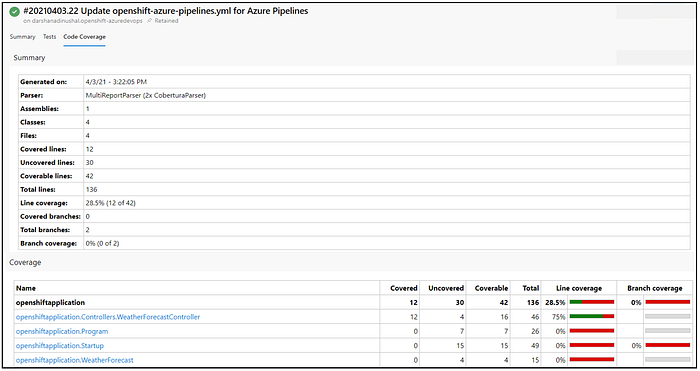
Run the pipeline and see the code coverage result.
Step 04 : Push Docker Image
The following YAML snippet we use with a Docker task to login and push the image to the OpenShift image container registry.

Run the pipeline and see the docker image upload successfully to image registry. Navigate to the image stream and see the images.

Step 05 : Continuous Delivery (Deploy To DEV)
In this step we are going to deploy docker image that we create in the previous step to the OpenShift deployment.
- Install Red Hat OpenShift deployment extension for Azure DevOps.
The OpenShift VSTS extension can be downloaded directly from the marketplace (Link).
- Go to https://marketplace.visualstudio.com/items?itemName=redhat.openshift-vsts .
- Click on Get it free.
- Select your Azure DevOps organization and click Install. Once this process finishes, the OpenShift VSTS extension install is complete, and you can start setting up your account.
2. Connecting to your OpenShift cluster.
Now, you need to configure the OpenShift service connection, which connects Microsoft Azure DevOps to your OpenShift cluster.
- Log into your Azure DevOps project.
- Click on Project Settings on the page’s bottom left.
- Select Service Connections.
- Click on New service connection and search for OpenShift.
- Pick the authentication method you would like to use (basic, token, or kubeconfig). See the details for each option in the next few sections.
- Insert your own OpenShift cluster data.
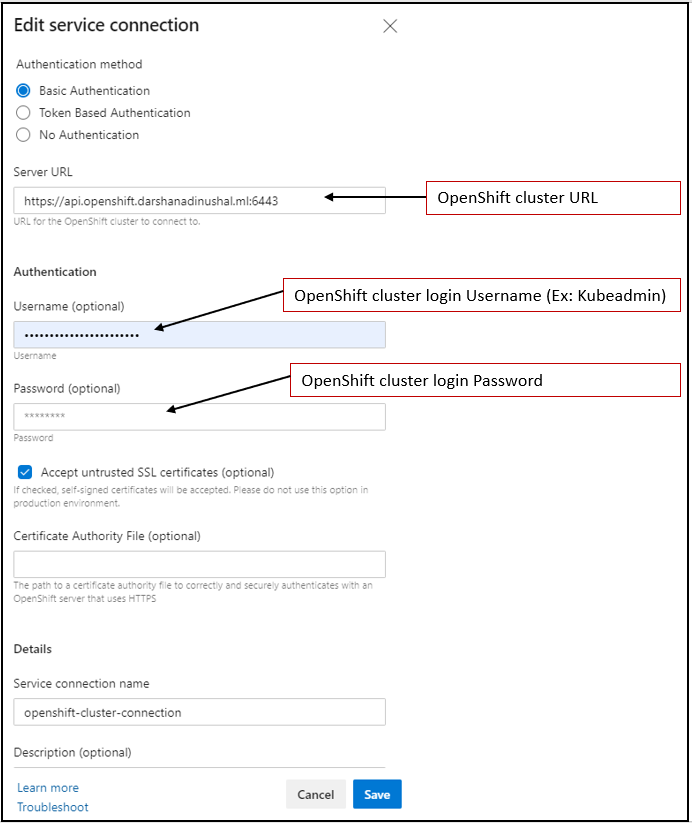
Once the extension can authenticate to the Red Hat OpenShift cluster, you are ready perform operations in OpenShift by executing oc commands directly from Azure DevOps.
3. Create deployment config to deploy docker Image to the DEV project
In this step we use OpenShift Developer perspective to create .net core application and build that application on the openshift.
The Developer perspective in the web console provides you the options from the +Add view to create applications and associated services and deploy them on OpenShift Container Platform (Link) . Navigate to Developer mode then Topology, chose Container Image option ,then configure following way.

You can download my deployment config file and other files from my git repository (Link). Run and Test your application.

4. Add DEV Stage in to the Pipeline.

Run the pipeline and see the new deployment successfully deployed to DEV project.
Step 06 : Continuous Delivery (Deploy To UAT)
- Tag dev image and push to the UAT image stream.
In this step we are tagging dev image and push that image into the UAT image stream.

Run the pipeline and see the docker image push to the UAT project image stream.
2. Create deployment config to deploy docker Image to the UAT project

3. Update azure DevOps pipeline with deployment.

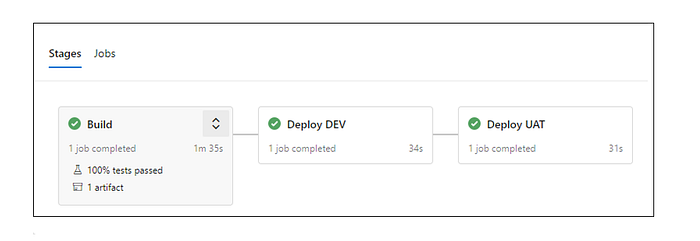
Run the pipeline and see the new deployment successfully deployed to UAT project.
You can download complete deployment.yaml file from my (GitHub).
trigger:
- master

pool:
  vmImage: ubuntu-latest

variables:
  tag: '$(Build.BuildId)'
  buildConfiguration: 'Release'
  project-name-dev: 'darshana-dev'
  project-name-uat: 'darshana-uat'
  image-repository-dev: 'imagestream-dev'
  image-repository-uat: 'imagestream-dev'
  development-cfg-dev: 'sample-dev'
  development-cfg-uat: 'sample-uat'
  container-name-dev: 'sample-dev'
  container-name-uat: 'sample-uat'

stages:
- stage: Build
  displayName: Build
  jobs:
  - job: BuildJob
    steps:
    - task: DownloadSecureFile@1
      name: caCertificate
      displayName: 'Download CA certificate'
      inputs:
        secureFile: 'tls.crt'
    - script: |
        echo Installing $(caCertificate.secureFilePath) to the trusted CA
        sudo chown root:root $(caCertificate.secureFilePath)
        sudo chmod a+r $(caCertificate.secureFilePath)
        sudo ln -s -t /etc/ssl/certs/ $(caCertificate.secureFilePath)


    - task: Docker@2
      displayName: 'Docker build & Create Docker Image'
      inputs:
        containerRegistry: 'openshift-image-registry'
        repository: '$(project-name-dev)/$(image-repository-dev)'
        command: 'build'
        Dockerfile: 'openshiftapplication/Dockerfile'
        buildContext: '.'
        tags: '$(tag)'


    - task: DotNetCoreCLI@2
      displayName: 'Run Test'
      inputs:
        command: test
        projects: 'openshiftapplicationtest/openshiftapplicationtest.csproj'
        publishTestResults: true
        arguments: '--configuration $(buildConfiguration) --collect:"XPlat Code Coverage"'

    - task: PublishCodeCoverageResults@1
      displayName: 'Publish code coverage report'
      inputs:
        codeCoverageTool: 'Cobertura'
        summaryFileLocation: '$(Agent.TempDirectory)/**/coverage.cobertura.xml'

    - task: Docker@2
      displayName: 'Docker Push Image'
      inputs:
        containerRegistry: 'openshift-image-registry'
        repository: '$(project-name-dev)/$(image-repository-dev)'
        command: 'push'
        tags: '$(tag)'

- stage: DEV
  displayName: Deploy DEV
  jobs:
  - job: Deploy
    displayName: Deploy-DEV-Job
    steps:

    - task: oc-setup@2
      displayName: Connect With OpenShift
      inputs:
        connectionType: 'OpenShift Connection Service'
        openshiftService: 'openshift-cluster-connection'

    - task: oc-cmd@2
      displayName: Select DEV project
      inputs:
        connectionType: 'OpenShift Connection Service'
        openshiftService: 'openshift-cluster-connection'
        cmd: 'oc project $(project-name-dev)'
        uselocalOc: true

    - task: oc-cmd@2
      displayName: Deploy Docker Image To DEV
      inputs:
        connectionType: 'OpenShift Connection Service'
        openshiftService: 'openshift-cluster-connection'
        cmd: 'oc set triggers dc/$(development-cfg-dev) --from-image=$(project-name-dev)/$(image-repository-dev):$(tag) -c $(container-name-dev)'
        uselocalOc: true

- stage: UAT
  displayName: Deploy UAT
  jobs:
  - job: Deploy
    displayName: Deploy-UAT-Job
    steps:

    - task: oc-cmd@2
      displayName: Tag Docker Image
      inputs:
        connectionType: 'OpenShift Connection Service'
        openshiftService: 'openshift-cluster-connection'
        cmd: 'oc -n $(project-name-dev)  tag $(project-name-dev)/$(image-repository-dev):$(tag) $(project-name-uat)/$(image-repository-uat):$(tag)'
        uselocalOc: true

    - task: oc-cmd@2
      displayName: Select UAT project To UAT
      inputs:
        connectionType: 'OpenShift Connection Service'
        openshiftService: 'openshift-cluster-connection'
        cmd: 'oc project $(project-name-uat)'
        uselocalOc: true

    - task: oc-cmd@2
      displayName: 'Deploy To UAT'
      inputs:
        connectionType: 'OpenShift Connection Service'
        openshiftService: 'openshift-cluster-connection'
        cmd: 'oc set triggers dc/$(development-cfg-uat) --from-image=$(project-name-uat)/$(image-repository-uat):$(tag) -c $(container-name-uat)'

        uselocalOc: true
Summary
Congratulation !!! Now you are ready to use the Azure DevoOps pipeline ,Once the developer commit the code changes to the branch and merge to master branch ,it will automatically trigger the pipeline deploy new version of the application to dev and UAT.
Enjoy!!! stay safe.